
IKEv2 VPN protocol is extremely secure while also providing high stability and performance speed. Therefore, it is one of the recommended VPN services for use on your device. This guide will step you through the security certificate installation and IKEv2 setup on the Ubuntu platform.
To connect from an Ubuntu machine, you can set up and manage the IKEv2 VPN service, connect from the Ubuntu desktop, or use a one-off command every time you wish to connect. Instructions for each are presented below. This setup supports Ubuntu 18.04 Desktop and up.
First, you have to install the security certificate provided by Wedge Networks. Please download the WedgeARP™ - Public Key to your computer and follow the instructions below to import the certificate into the trust store for Ubuntu 18.04 Desktop:
1. Generate a .crt file as the ca-certificates package in Ubuntu can only read *.crt files.% openssl x509 -in wedgearp-ca.pem -inform PEM -out wedgearp-ca.crt
2. Copy the .crt file into the proper directory.% sudo mkdir -p /usr/share/ca-certificates/warp
% sudo cp -v wedgearp-ca.crt /usr/share/ca-certificates/warp
3. Import the certificate.
3.1 Interactive mode
% sudo dpkg-reconfigure ca-certificates > (on first page) Select 'Yes' > (on second page) Scroll to bottom and ensure 'warp/wedgearp-ca.crt' is selected, then tab, then click OK
3.2 Non-interactive mode
% sudo update-ca-certificates
The certificate is now imported. Please proceed to the next steps below.
Let us begin below:
1. Log in to Ubuntu server and open a terminal window.
2. Update your local package cache: sudo apt update
3. Install StrongSwan and the related software: sudo apt install strongswan libcharon-extra-plugins
4. Copy the WedgeARP Public Key wedgearp-ca.pem to the /etc/ipsec.d/cacerts directory: sudo cp /tmp/wedgearp-ca.pem /etc/ipsec.d/cacerts
5. Configure your VPN username and password in the /etc/ipsec.secrets file: your_username : EAP "your_password"
6. Edit the /etc/ipsec.conf file to define your configuration.
config setupconn ikev2-rwright=server_domain_or_IP# This should match the `leftid` value on your server's configurationrightid=server_domain_or_IPrightsubnet=0.0.0.0/0rightauth=pubkeyleftsourceip=%configleftid=usernameleftauth=eap-mschapv2eap_identity=%identityauto=start
Note: Bolded items above need to be updated / changed by user as these values are variables.
To connect to the VPN, type:
sudo ipsec start
You are now running a VPN connection through the IKEv2 protocol.
To disconnect again, type:
sudo ipsec stop
This configuration supports Ubuntu desktop 18.04 and up.
Let us begin below:
1. Log in to Ubuntu desktop and go to All programs at the bottom left corner of the window.

2. Enter the search feature to find and run the Terminal.

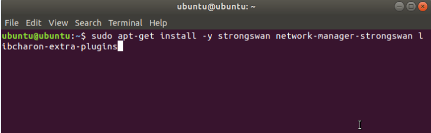
3. Install applications with the command: sudo apt-get install -y strongswan network-manager-strongswan libcharon-extra-plugins.
4. On the desktop, click the settings icon on the top menu at the right corner of the window. Choose the Wired Connected setting and click Wired Settings to open the network settings window.

5. Click the + sign on the VPN settings and the VPN settings window will pop up.

6. Choose IPsec/IKEv2 (Strongswan) and enter the parameters for the VPN as shown below. Note, the "Address" server is provided in the welcome email by Wedge Networks.

When you type in the password, please click the question mark in the password field and choose to Store the password only for this user. Click Add to finish the configuration.
7. You can either connect to the IKEv2 VPN on the network settings window to turn it on, or you can do so via the top menu.

8. After the VPN connection has been created, you will see that there is a lock icon on the top menu.

You are now running a vpn through the IKEv2 protocol.
To disconnect the VPN, click the lock icon and choose the VPN connection to turn it off.
Let us begin below:
1. Update your local package cache: sudo apt update
2. Install charon-cmd and related software sudo apt install charon-cmd libcharon-extra-plugins
3. Move to the directory where you copied the CA certificate: cd <^>/path/to/wedgearp-ca.pem
4. Connect to the VPN server with charon-cmd using the server’s CA certificate, the VPN server’s IP address, and the username you configured: sudo charon-cmd --cert wedgearp-ca.pem --host vpn_domain_or_IP --identity your_username
5. When prompted, provide the VPN user’s password.
You are now running a VPN connection through the IKEv2 protocol.
To disconnect, press CTRL+C and wait for the connection to close.
Note: WedgeARP™ Secure Home Office assigns a static IP address per user tunnel. A user can only have ONE active tunnel at a time. The most recent connection will become the active tunnel for the user.
Caution: Please note that you will need to configure your device using the generated settings by yourself and at your own risk.
For further information, please contact Wedge Sales Support Centre at: 1-888-276-5356.